Showing posts with label vinyl. Show all posts

Sunday, June 12, 2011

Getting Cricky Simply Sunday Challenge: Anything Goes

This week it is "anything goes" at Getting Cricky.  I can't wait to see what you have to create for this challenge!


For my project I made a wedding gift.  I saw something like this on YouTube once. This project is an example of why I call myself the "Crafting Misfit." I tried to do it just like she did.  YIKES!  NOT a good turn out.  It was a nightmare.  There were tears, a bit of wanting to kick my Cricut, and of course it was all my husband's fault. LOL.  The issue was getting the glue to keep the glass on the frame.  I tried a glue gun.  NOT something that worked. So, I was going to try another glue that a good friend recommended but I ended up running out of time to get back to the store.  So my husband gave me something to use- this is why it is all his fault LOL.  That glue, or whatever it was, didn't work well because it kept smearing on the glass.  So, I spent lots of time with Windex and a razor blade trying to clean the glass.  In the end, I was mostly satisfied with the gift although I wish it had been cleaner.  Wow, now that was a long story!!! 

The black font is Base Camp and the gray is Gypsy Font (I think!)  I thought I saved the file, but I didn't :(

Here is one I made for another wedding:


Don't forget about the blog hop and UStream coming up Friday night the 17th!  There will be lots of blog candy along the way and some great chances for free stuff!!!  Are you planning on joining us?!


Thanks for looking!

Sunday, May 8, 2011

NSD Challenge #12


Challenge number 12 from My Pink Stamper--Make a Scrapbook Page, Card, or other with a Kid's theme! 

This is a bucket of dirt for my son!  He turns 10 tomorrow (Yes, there have been tears from me.).   I have no idea how he can keep getting older and I don't age a bit ;)  Every year on his birthday he requests that I make dirt for his friends at school.

There are all sorts of recipes for this online but I don't do cooking.  I don't do recipes.  I really don't do kitchen.  So I made 3 small things of chocolate pudding and let it set.  Then I stirred in a big thing of cool whip.  I put gummy worms throughout the bucket.  Then I got some Oreos and crushed them up.  I layered Oreos and pudding mix throughout the bucket. 

The Happy Birthday is from Celebrations and the font for my son's name was done with  Lyrical Letters.  Lyrical Letters is quickly becoming my new favorite font!  It is on there with repositionable vinyl.

Wednesday, April 6, 2011

Baby Shower Gift

Hi there,

Sunday I have a baby shower for a very kind lady in our church.  She is having a little boy and decorating the room with a jungle theme.  So I made this personalized gift for her baby.

All the animals are cut from Zooballoo and so is the font.  I used Core'dinations cardstock for the animals (except the black and white on the zebra).  I sanded them all very lightly to give it a little texture and more "fur like."

The vinyl is on the glass.  I had a little trouble with the shadow and the regular font adhering correctly but I am OK with the end result.  I would like to move the letters some but I am afraid I would only mess it up more!!!

 
Pick out a frame.  I got this one on clearance and it was perfect for what I wanted to do.

I tend to put a million things on my mat at once.  It minimizes how long I have to wait for cuts.

 I used the "pictures" that came in the frame and cut my cardstock to cover them perfectly.  This is Core'dinations cardstock from their Ebony & Ivory pack.
 One animal at a time :)


After putting all the animals on I measured my frame and drew lines on the glass with marker.


* I then put the green layer of letters down on the glass.
* The blue letters had to be done one letter at a time because of the shadow feature not lining up right.
* I did use transfer tape.  Vinyl sticks fast on glass so you need to work quickly and as accurately as possible.

I linked this over to Getting Cricky which you can find here.  Her challenge this week was about creating something from the heart, something that inspires you.  Not much inspires me more than new life.  I loved creating this and thinking of the baby and the mom receiving it.
Thanks for visiting!!!!

Saturday, March 26, 2011

Project for my son's door

Hello again!

My husband says I am a blog addict.  What does he know?!  Seriously, is compulsively reading blogs and working on projects to post an addiction?!  MEN!  The great news is today while playing with sanding some new cardstock I was able to watch him fold laundry ;)

Some friends and I started a "Cricut Club."  Now, if you read through my other posts you realize, and can see that I fully accept and admit, that I am a geek.  So, this club suits me just perfect ;)  One of the craft stores has generously allowed us to use their classroom to meet in.  Which in itself is terribly dangerous to the wallet.  ANYWAY, today our project was vinyl on glass.  You will also learn quickly that I do love vinyl.

I made this sign for my son's wall.  The frame was on clearance for $1.98!  The paper is from the "All About Boys" scrap pad.  I think that was DCWV.  The "Rick" is cut out using my Cuttin' Up cartridge.

Thanks for stopping by!!!!  If you have less than 75 followers check out my Linky Party!

Wednesday, March 23, 2011

Bunny Bulletin Board


This it outside my classroom right now.  I had the kids all write something they have learned so far this year on their egg.  They then decorated their eggs.  They loved it!

The big bunny was a cheap discount thing I got from Oriental Trading Co. 

It is hard to see in the picture but the lettering is on glittered contact paper... HOW COOL IS THAT?!  One of my co-workers  was cleaning out her basement and found it and gave it to me.  I LOVE IT.  The "Hippity Hop" is from Animal Kingdom.  The "Hopping Along" is from Learning Curve.

Again, something hard to see in the pics is that I do have some eggs on here from Designer's Calendar.  Tomorrow I may attempt some better photos.

The little bunny in the upper left hand corner is from Lyrical Letters.  It doesn't have a layering feature so I had to mess with it some.  I used glitter because it was fun :)


I thought I would also submit this too the bunny challenge at Cardz TV

Saturday, March 19, 2011

Pinewood Derby and Vinyl

My son's Pinewood Derby was this morning. He was SO EXCITED to decorate his car.  He is also a lover of my Cricut for sure.  So together we cut vinyl for his car with my brand new assorted vinyl colors.  How much fun is that?!  It was fun to do it with him and watch him  pick out his images.  I didn't think of this vinyl idea on my own.  Most of my ideas aren't my own :)  Thanks to my friend Carol she shared the vinyl idea!

We used Indie Art and Graphically Speaking for the flames.  The Graphically Speaking was on the back and doesn't show in any of the pics.  I will have to take one later and post it.  I THINK we used Learning Curve for the numbers.

We struggled with getting the dang vinyl to stay on the wood.  It was a nightmare as it kept lifting.  We sprayed some shellac over it to attempt to hold it down.  Yeah, we get an A for effort but not so much for product ;)

Before


At the end of the day my son was excited to take home a trophy for "Best Design" in his den!!!  YAY!  I am a proud mother.  We celebrated with lunch after.  My son took his car, ribbon, and trophy into the restaurant and laid them in the middle of the table for everyone to see.  All the employees (owner, cook, waitresses) came out and asked him about his car and gave him a free ice cream.  This was a HUGE day for him, unfortunately, my son struggles with many things so when he has an accomplishment we CELEBRATE!  It made us so happy to see him feel successful today.  I just wish I could bottle that up for him for a day when he isn't feeling so great about himself.  If you have seen another post about my kids you will see that I won't post pics of my kids faces online, but I have this some of him holding the trophy for you to see!

Monday, March 14, 2011

Black and White "monogram"

(If you are visiting my blog and you have less than 75 followers check out my Linky Party on the post just before this... I would LOVE to have you!!!)

Funny how our tastes change as we get "older."  I used to hate things with initials on them.  Now I just LOVE it.  I also love black and white because it is so clean.  My favorite projects look clean and simple when they are done.

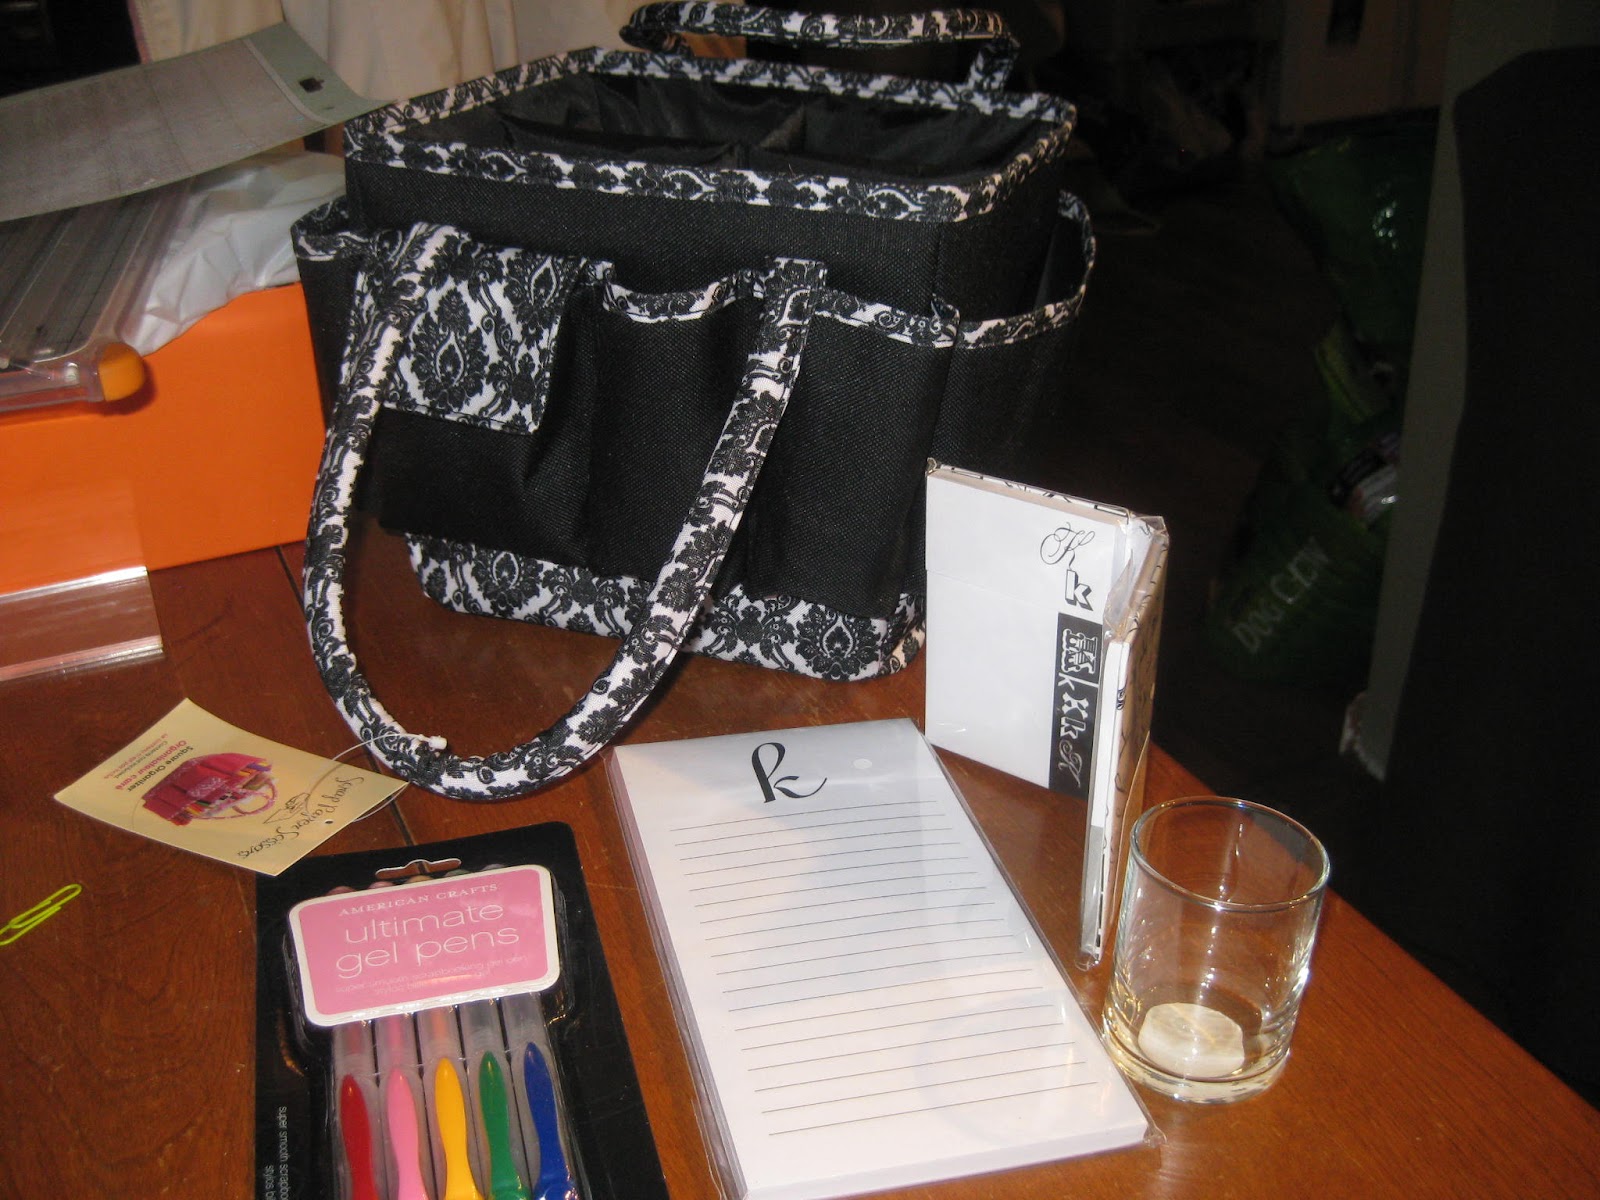
This is the before picture of my gift.
I also love making things for people who are special to me.  So, I have a friend who just celebrated a birthday and I thought I would spice up a few things I picked up for her.


For the fonts I used Lyrical Letters, Plantin Schoolbook, and Base Camp (I think.  For some reason my Gypsy won't show me the cartridges on this project.)
This opens up and is filled with various size sticky notes with "k" on it.  How cute is that?!  All I did was put the vinyl white rectangle and black k.
This is the final gift, I have the gel pens hidden in the bag... they aren't pretty enough to be in my pic LOL!

For the 9x4 card/notepad holder I used a cereal box and covered it with cardstock.  The K on the front comes from the alphabet scrap pad.

The magents are flat rocks from the Dollar tree.  I applied scrap black and white paper to the back.  Then I used the magent I took off the notepad that I put in the card.

I stuffed some gel pens in too because I love mine so much!  They aren't all black and white though so I had to take them out of my pic. :)

I had a lot of fun making this for my friend!!!

Instead of doing a card for this gift I turned the notepad holder into one!  A practical usable card.  The card is 9x4 just like the challenge over at Cricut Cardz Challenge.

Monday, February 28, 2011

Vinyl on Wall!

Before

After


ANOTHER snow day!  The last day of February and we are getting dumped on.  At least I get a day off from work with my kids. :)

In my craft space (I can't really call it a room but it is a space I have taken over for my "stuff") the walls are just plain green.  Nothing really matches in there which drives my husband nutso!  I love it because it actually means he won't bug me when I am in there. ;)  I used Lyrical Letters, black vinyl, and my favorite- transfer tape!  For the MOST part this was fun.  The vinyl and I had a few discussions about staying put when I told it to.  We also disagreed on how to make it all look straight.  In the end I won and the vinyl is stuck where I wanted it.

So today I thought I would put a quote on the wall.  My mother is really good with finding quotes so I asked her to help me.  She found this one and I thought it was appropriate.  When I put it up my 9 year old said, "Yep, Mom that is you.  You have a lot of enthusiasm and you make great stuff."  Got to love that kid!

Giving credit- this quote was said by Earl Nightingale.

Thanks for visiting!


Sunday, February 13, 2011

Valentine Treats for Teachers

For a Valentine's treat my kids wanted to dip pretzels in chocolate.  So we got some pretzel rods and dipped them in white chocolate and then sprinkled them in pink to be more festive!

I took recycled tin cans and made something to put them in to dress them up a bit.  My son and daughter picked very different styles for their teachers!
 The font on this one is Gypsy Font
The font on this one is A Child's Year.  The letters and dots on this one were done with white contact paper.  I also did learn that the contact paper would peel off the paper without any issue.  That was a discovery I was very happy to make!

Now, the damage from this little project... don't try to wash out the inside of a can with a lot of strength while running your thumb around the inside rim.  I have bled through a few band aids on my thumb in the past couple hours as a result of that choice :)

For challenge at  My Sheri Crafts
This is also for the "Something Sweet" challenge at Cooking With Cricut.  What is sweeter than chocolate dipped pretzels?!

Wednesday, February 9, 2011

Personalized Body Wash

One of my dear friends has a special little girl.  I promised that little girl a prize if she lost her tooth.  She was also giving her mom a hard time, like all girls do, the other night over a bath.  So I thought maybe her own special soap would make that smoother for mom... who knows, if she is as independent as my child nothing helps!!!


I started with a regular body wash I got at the drugstore.  I did use Goo Gone to remove the label residue.  It was quite yucky!!!

 Then I cut out the name and Hello Kitty on Dollar Tree contact paper.  I did use transfer paper this time to get the lettering on the bottle.  I think transfer paper is worth every penny!!!!!  I am a believer.

For this I used the Learning Curve and Hello Kitty Greetings Cricut cartridges.  What I liked best is this was a super easy and fast project!

Saturday, January 29, 2011

Name Sign

For my aunt's birthday I wanted to try out something I haven't done before.  She has a really cute house with lots of unique and tasteful things on the walls.  So I wanted to give her something personal for the house.
First I got a frame:
 The print on the scrapbook paper doesn't show up all that much in the pics.  Sorry about that!
I used the Base Camp font cartridge for the lettering and made it the correct size by using my Gypsy.    Then I cut the name out onto black card stock to see how it looked and to pick the background.  The background is just a design piece of card stock.  One thing that bothers me about this font when I look at the pics is the size of the "O"s... I find it odd that they are taller and this will make me crazy forever now!!!!  Anyway, once I liked it all I cut it on vinyl and used transfer tape to adhere the letters to the outside of the glass.  I find it important to mention here.... the transfer tape rocks my world!  I WILL be using this from now on when doing a vinyl project.

Related Posts Plugin for WordPress, Blogger...