Tuesday, March 29, 2011

No craft this morning! However, there is a good video song at the end of my post!

I am working on a couple of "bigger" projects.  So, not craft this morning.  Piece of it may come tonight.

Instead you get my tidbits on life today :)  I haven't really posted "life" stuff before but today it weighs heavy on my heart.  You may want to skip it since it is my ramblings, but I still challenge you to watch the youtube video at the end and remind yourself of what really matters in life :)

Last night I intended to finish one of the projects to show.  However, God had other plans.  My husband is a volunteer fire fighter.(Fire fighter of the year in fact.  I have to brag :)  Who doesn't want to be married to a hot fireman? :) )  Last night while I was crafting he was called to a fatal accident.  As he was at the accident I was listening to the police scanner.  While he was gone I couldn't help but think I stress over all the tiny stuff in my life.  I think if my paper isn't lining up right I am in crisis mode.  When my kids are fighting I am pulling my hair out.  I locked myself out of the house before work yesterday forgetting to shut off the coffee maker and I stressed.  I look at what my kids bring home for homework and wonder how we can possibly accomplish that in a night.  Those silly things a particular person does that drive you crazy get out of control to you.  So, while I stressed out over silly stuff some mother was learning she was going to have to bury her son.  This pain is no stranger to my family, as my mother had to do the same when my sister was only 22.  So last night I found myself thinking more about all the small blessings and the large blessings in my life.  Every now and then God kicks my butt and tells me to think about what I have.  Last night was one of those nights.  Regardless of your personal religious convictions this message applies to all of us.  It is what we choose to do with those little things, how we handle those frustrations that define us.

If you have NOT heard this song you have got to hear it.  It is all about the little stuff and how it gets to us.

Monday, March 28, 2011

Blog Hop

I am going to do a blog hop from here next week. If you are interested in being one of the designers and stops on the hop let me know by email please!  I will pick the people and email you the details by Friday night!  rmbhenry@gmail.com

Sunday, March 27, 2011

Spring Card

Tonight I got home from grocery shopping and it was just about 25 degrees.  I have had enough of the cold!  Tomorrow's high is said to be 36 degrees.  So, I wanted to do something SPRING like!!!
You may have seen this fabulous blue flower paper in an earlier post.  I posted it here.  Well, little did I know you actually CAN sand that paper!  I loved it just based on the embossing and bought a ton of it.  Now I have seen even more potential in it.  So you know what I did? Went back to the store and bought more.  I can't WAIT to play with that!!!  This paper is made by Core'dinations.  The green paper is made with that too.  You should have seen hubby's face when I asked for sandpaper.  He had to explain the numbers on the sand paper to me ;)  I used 150 for this.

For the lamb I looked at one of my favorite blogs, Jessica at Chick N Scrap.  She does a much better job on the patchwork.  This was my first attempt and I will try again for sure.  Jessica has a nice tutorial on her site.  I cut the lamb from Animal Kingdom.

The lettering is from Lyrical Letters.  I used my Cricut Ink for the first time!!! LOVE LOVE LOVE it!!!

Thank you so much for visiting!  Thanks in advance for all of the blog lovin'!!!

Challenges:
Queen of my craftroom use ugly paper
Here are 2 of the pieces I cut down for the lamb.  Ugly enough? :)

CWC lions and lambs

Delicious Doodles is floral fantasy.

Paper Cutz Challenge 3 patterned papers (all on the lamb)
 My Sheri's Crafts is spring

Saturday, March 26, 2011

Project for my son's door

Hello again!

My husband says I am a blog addict.  What does he know?!  Seriously, is compulsively reading blogs and working on projects to post an addiction?!  MEN!  The great news is today while playing with sanding some new cardstock I was able to watch him fold laundry ;)

Some friends and I started a "Cricut Club."  Now, if you read through my other posts you realize, and can see that I fully accept and admit, that I am a geek.  So, this club suits me just perfect ;)  One of the craft stores has generously allowed us to use their classroom to meet in.  Which in itself is terribly dangerous to the wallet.  ANYWAY, today our project was vinyl on glass.  You will also learn quickly that I do love vinyl.

I made this sign for my son's wall.  The frame was on clearance for $1.98!  The paper is from the "All About Boys" scrap pad.  I think that was DCWV.  The "Rick" is cut out using my Cuttin' Up cartridge.

Thanks for stopping by!!!!  If you have less than 75 followers check out my Linky Party!

Friday, March 25, 2011

I made a blog button!


I am a total geek!  The highlight of my week was finding out that Droid apps are coming to my Nook Color this spring.  This is my happiest news since getting my iTouch.  Now I need to find some crafting apps!!!

Then today I spent, well I would rather not say how many hours.... coming up with a blog header and a button. 

It is done until I get bored again someday and want a change :)

You can grab my button if you want it for your blog!  Just look over on the left hand side for it.

Cool Blog Decorations

I am jealous, I admit it.  It is wrong.  So now I confess that I am breaking one of the 10 commandments.


Anyway, I want a cool blog.  Some of you have these beautiful headers and fun templates.  I have been scouring the web for information on how to do this.  I am DETERMINED to make this work for me this weekend!  I also, of course, am too cheap to spend money on it.

Any advice, tips, words of wisdom?!

OK I spent wayyyyyyyyyyyyyy too much time on this today but I am happy with what I have now! :)

Thursday, March 24, 2011

Versatile Blogger Award- Thanks JESSICA!

Thanks to Jessica at Chick-N-Scrap for this award!  If you haven't seen Jessica's work you really need to get over there and see what this girl can do!  Receiving an award from someone with her skills is incredibly awesome to me!!!


The rules of this award are as followed

1.  Thank the person who sent it to you
2.  Tell 7 things about yourself
3.  Send this to 15 bloggers
Well the thanking Jessica was by far the easiest part!

Hmmm.... 7 things about myself.... I hope at least one is interesting to you!
1. I have no ability to keep plants alive. I, in fact, am an expert at spending lots of money on pretty flowers and veggies and killing flower and vegetable gardens!

2.  I love reading.... almost as much as I love crafting.
3. Coffee is my primary food group.
4. I want to be organized.  I am fabulous at designing organizational systems.  Buying cute things to organize is my forte.  The whole maintaining thing is a bit tough for me.
5.  I am not good at keeping my room clean.
6.  My husband is a firefighter but I am scared to death of fire.
7.  I enjoy various opportunities to volunteer for community events and in other organizations.

Passing this on to other blogs.... NOW here is the HARD part!!!!  There are so many good ones out there!

1. Justine at Crafts N Cards Cricut Corner
2. Creating A Crafty Life
3. Houses Built of Cards
4. Little Scrap Pieces
5. My Creative Corner
6. Nadia's World
7. Nap Time Creation
8. From Me to You
9. Deanne's Creative Juice
10. Rachel's Paper Crafts
11. Scrappin With Lala
12. Roxx at Dreaming of Crafting
13. Sherrie at Scraps with Passion
14. Kyle at the Green Cricut
15. Sugar Baby Boutique

Wednesday, March 23, 2011

Bunny Bulletin Board


This it outside my classroom right now.  I had the kids all write something they have learned so far this year on their egg.  They then decorated their eggs.  They loved it!

The big bunny was a cheap discount thing I got from Oriental Trading Co. 

It is hard to see in the picture but the lettering is on glittered contact paper... HOW COOL IS THAT?!  One of my co-workers  was cleaning out her basement and found it and gave it to me.  I LOVE IT.  The "Hippity Hop" is from Animal Kingdom.  The "Hopping Along" is from Learning Curve.

Again, something hard to see in the pics is that I do have some eggs on here from Designer's Calendar.  Tomorrow I may attempt some better photos.

The little bunny in the upper left hand corner is from Lyrical Letters.  It doesn't have a layering feature so I had to mess with it some.  I used glitter because it was fun :)


I thought I would also submit this too the bunny challenge at Cardz TV

Tuesday, March 22, 2011

Explosion Box- Step by Step How to with pictures

A few of you asked for this via comments on my blog and emails.  I LOVE that I can share some quick easy steps with you so you can make your own!!!  If you have other questions or suggestions on how I can do these better PLEASE let me know!


BASIC supplies
-- 4 pieces of double sided card stock.  3 must be 12x12 and one has to be 7 1/2x 7 1/2 or larger.
I highly recommend at least two pieces of "stronger" paper for the outsides.  I use Bazzil basics. 
-- Paper Trimmer
-- Scissors
-- Adhesive
-- Something to score the papers
Then you will want embellishments and other papers to dress up the "pages" in your box.

Cutting the layers

1. Set aside the piece you want to be the bottom outside of your box.
2. Cut one sheet to 11x11
3. Cut one sheet to 10x10
4. Cut one sheet to 7 1/2x 7 1/2 (this will be your box cover)
You should now have 4 sheets cut at different sizes.
 
Scoring the layers

1. Score the 12x12 sheet on all four sides at 4".

Be sure not to go all the way through the page.  That may seem like common sense, however, I manage to do it EVERY time.  IN fact, I just did it trying to prepare the one I am doing for these instructions!

What you end up with looks like a tic-tac-toe grid.

2. Score the 11x11 sheet on all four sides at 3 3/4" on each side.

3. Score the 10x10 sheet at 3 1/2 " on each side.


Cutting the 4 corners

1. On each of the 3 papers you have scored you are going to cut the four corners off.  I use my paper trimmer for this because I can't cut a straight line even if it has been scored.


The cover

1. Take your 7 1/2x 7 1/2sheet and score it at 1 3/4" inches all the way around.

2. Cut in on 2 sides only.  Cut opposite sides until the lines meet.  I have NO IDEA how to put this into words so check out the picture :)

3. Fold in those tabs and put a ton of adhesive on them then form it into a box.  Again, see the pics on this one.

Put your lid aside again.  If you used glue you can put some paper clips on it to make it all stick well.


Take your box layers back now.
1.  Take your smallest one and flip it upside down.  Apply adhesive to the center square only.

2.  Stick that layer onto the center layer.

3. Apply adhesive to the back side of your 11x11 piece, center only.

4.  Stick that middle layer to your outer layer.
YOUR BASIC BOX IS NOW DONE!!!!  You should be able to close up the box and stick the lid on it!

All you need to do now is decorate!

I am going to put how I am decorating this one here for you.  If you care to read it all ;)

I save all those squares I cut off.  I may reapply them in places while decorating.  Because I used all solids for my box layers this time I am using patterned paper for decoration.

1. Cut a bunch of squares to put on the box layers.  I cut at 3 3/4 (4 of them), 3 1/4 (8 of them), and 2 3/4 (8 of them)

2.  Adhere your squares to the cards.  I do front and back of each panel. (With the exception of the outside of the box.)  This sounds silly, but again I have made the mistake, always put your adhesive on the smaller of 2 pieces.

This step is when I realize that despite my best efforts nothing is straight.  I cure this issue with a chilled glass of Moscato.

After all this I put a tag in the middle and stamped it.  This is a thank you gift for someone who helps me out in my classroom.  I put a square on the panels and I am going to have my kids sign on the blank squares.


Thanks for checking out the directions.  Let me know if they work or don't work for you!

Challenges:
Color challenge, at least yellow, lavender, pale green, and rose at Claudia and Company
Thank you with tag Celebrate the Occasion

Monday, March 21, 2011

Explosion Box Album- Create A Critter

Well hello again!  I apologize in advance for being heavy in pics for this post.  This thing is hard to photograph!

Can you believe it is the end of March and I we got sent home today for a partial snow day!  I am no longer thinking all this white fluffy stuff is pretty!!!  I have been working on a SPRING project to help with the depressing and bleak weather.
My intention with this explosion box is to give it to my daughter with her birthday gift. Part of me wants to add more to the box and part of me wants to leave it as is.  Decisions decisions.

The animals are all cute with Create A Critter and so are the words in the center.  I used one of my punches for the edging on the cover of the box, I didn't like my first cover at all!  The paper is all from a K&Company pack... and I LOVE it!!!  My sister bought herself a Cricut. She had some questions on how to use the buttons on the top of it.  Well, I have a Gypsy so I have no clue how to navigate the buttons on the Expression.  So she came and hung out with me to learn how to use the buttons... and created me these critters!  You can check out her BRAND NEW blog at Crafty Gator.


The challenges:
At Linda's Creativity the guest designer has challenged us to use our punches.  At this point, I only own 1 border punch.  My husband got it for me for Christmas.  At the time I wondered what in the world I would do with it.  Well, I LOVE using it... who would have thought he knew better than me?  Don't tell him!!!!

Over at All Sorts Challenge she wants us to make gift boxes... how perfect is this as a gift box?  Just tuck a little gift card in or use the box as a gift!

At Creative Time For Me's Throwback Thursday Challenge she tempts us to use any older cartridge.

2 Sisters Challenge  this week is "Furry Friends"

This week it is any theme any colors at Paper Cutz Challenge

This is a birthday gift so I thought I would enter it into the birthday challenge at Fantabulous Cricut 

This is also 3D for the challenge at Delicious Doodles

I also saw a challenge out there to use Create A Critter... do you think I can find that now?!  The story of my life ;)

Saturday, March 19, 2011

Another thank you card for another great friend!

There are times when you appreciate your friends and there are times when you don't know what you would do without great friends.  This card is for another friend that helped me out during my surgery.  She made us a yummy dinner :).  The flower card I posted earlier today goes to a friend who sat at the hospital waiting for me for HOURS!

I really enjoy challenges and hops because they actually give me a place to start.  If I stand in my craft space and think "I need to make a thank you card."  I take an hour just to pick a color, another hour to decide what size, another hour to pick a sentiment.  Then I hate it and throw it away and get a glass of wine... or two... well, maybe three if it was particularly bad.  So today I picked 2 to inspire this card.  CWC wants us to use two shades of green this week.  Honestly, after St. Patrick's Day I am ready to be done with green.  I am ready for SPRING.  I cut a simple square out and stamped the sentiment in gold because Fantabulous Cricut is challenging us to use green and gold this week.  I added some gold eyelets for fun.  I used my Crop-O-Dile on that.  Now, I have liked my crop thingy BUT it was one of those things I bought and never really learned how to use.  I took a look at it tonight... I see a YouTube instructional video in my near future!!!  As you can see, I really am a CRAFTING MISFIT!  The pics also show how badly I need a new blade... EEK!

Thank You Card, Life Is A Beach

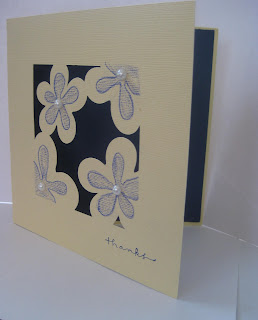
This is a thank you card for one of my friends that made me a meal while I was recovering from my surgery.

This card went through SEVERAL attempts before I was ok with how it came out.  So, I have plenty of scrap cards LOL!  

The flower is cut from Life is a Beach per the challenge for CCCC.  I had to adapt the flower because the stamen sort of shoots out of it, and frankly without a layer option it looked bizarre and male anatomy like.  I know that is totally inappropriate but it was way too much for me to look at so I cut it off.   Sorry if all that offends you but hey you should have seen the card. :)  I made the colors in yellow, blue and white with the card/border option per the challenge at Cricut Cardz Challenge.

I cut the card, used colored pencils for the flowers, and "pearls" from the dollar items at A.C. Moore.  The stamp is part of a stamp I picked up out of a dollar bin somewhere.  The yellow card stock is some Bazzil Basics stuff with texture.


Thanks for visiting!  Welcome to any new followers!!!

Pinewood Derby and Vinyl

My son's Pinewood Derby was this morning. He was SO EXCITED to decorate his car.  He is also a lover of my Cricut for sure.  So together we cut vinyl for his car with my brand new assorted vinyl colors.  How much fun is that?!  It was fun to do it with him and watch him  pick out his images.  I didn't think of this vinyl idea on my own.  Most of my ideas aren't my own :)  Thanks to my friend Carol she shared the vinyl idea!

We used Indie Art and Graphically Speaking for the flames.  The Graphically Speaking was on the back and doesn't show in any of the pics.  I will have to take one later and post it.  I THINK we used Learning Curve for the numbers.

We struggled with getting the dang vinyl to stay on the wood.  It was a nightmare as it kept lifting.  We sprayed some shellac over it to attempt to hold it down.  Yeah, we get an A for effort but not so much for product ;)

Before


At the end of the day my son was excited to take home a trophy for "Best Design" in his den!!!  YAY!  I am a proud mother.  We celebrated with lunch after.  My son took his car, ribbon, and trophy into the restaurant and laid them in the middle of the table for everyone to see.  All the employees (owner, cook, waitresses) came out and asked him about his car and gave him a free ice cream.  This was a HUGE day for him, unfortunately, my son struggles with many things so when he has an accomplishment we CELEBRATE!  It made us so happy to see him feel successful today.  I just wish I could bottle that up for him for a day when he isn't feeling so great about himself.  If you have seen another post about my kids you will see that I won't post pics of my kids faces online, but I have this some of him holding the trophy for you to see!

Monday, March 14, 2011

A fun award from Donna!

Thanks to Donna at Donna's Dreamworks I have received another Leibster Blog Award!  Thank you so much Donna, you create awesome things!  Jump over and check out her blog.


With this award I am challenged to pay it forward to 3-5 bloggers that I follow that have less than 300 followers. I have chosen the following great sites:  (This part is soooooooooooooo hard.  There are so many fabulous sites!!!)

Dina at Crazy for Cricut
Karen at Little Scrap Pieces
Jan  at Living-4-Orange
Nadia at Nadia's World
Houses Built of Cards

Black and White "monogram"

(If you are visiting my blog and you have less than 75 followers check out my Linky Party on the post just before this... I would LOVE to have you!!!)

Funny how our tastes change as we get "older."  I used to hate things with initials on them.  Now I just LOVE it.  I also love black and white because it is so clean.  My favorite projects look clean and simple when they are done.

This is the before picture of my gift.
I also love making things for people who are special to me.  So, I have a friend who just celebrated a birthday and I thought I would spice up a few things I picked up for her.


For the fonts I used Lyrical Letters, Plantin Schoolbook, and Base Camp (I think.  For some reason my Gypsy won't show me the cartridges on this project.)
This opens up and is filled with various size sticky notes with "k" on it.  How cute is that?!  All I did was put the vinyl white rectangle and black k.
This is the final gift, I have the gel pens hidden in the bag... they aren't pretty enough to be in my pic LOL!

For the 9x4 card/notepad holder I used a cereal box and covered it with cardstock.  The K on the front comes from the alphabet scrap pad.

The magents are flat rocks from the Dollar tree.  I applied scrap black and white paper to the back.  Then I used the magent I took off the notepad that I put in the card.

I stuffed some gel pens in too because I love mine so much!  They aren't all black and white though so I had to take them out of my pic. :)

I had a lot of fun making this for my friend!!!

Instead of doing a card for this gift I turned the notepad holder into one!  A practical usable card.  The card is 9x4 just like the challenge over at Cricut Cardz Challenge.

Thursday, March 10, 2011

I am having a Linky Party for new bloggers to celebrate my new page design! SPREAD THE WORD ABOUT THE LINKY PARTY!

I changed my set up on the blog. The orange was cute I thought but it was distracting to me. It was confusing me when I say up WAY TOO LATE at night and post! No coffee and bright orange do not mix for me.

Anyway, in celebration I am doing a Linky Party! Spread the word to new bloggers for me!!!

It would be FABULOUS, but NOT required, if you linked to this blog from that post or made a new post telling others about the Linky Party with a link! The more we have the more your project will get seen!

Here are the rules:
1. You must have less than 75 followers.
2. You must become a follower of this blog.
3. You can post your favorite project on your blog- it does NOT have to be a new project. Remember post directly to that blog post and not your blog in general.
4. Please leave a comment after you link up!


Here is a project I did at Christmas. In each tin I put a few pieces of candy and an activity to do in preparing for Christmas, like have a slumber party under the tree or dance with just the Christmas lights on.


Related Posts Plugin for WordPress, Blogger...