Sunday, April 24, 2011

WINNER POSTED!

HAPPY EASTER!

The winner of my blog candy is posted at the end of this post!

I hope today you have some time with your family to reflect on what you find important!  We started off nice and early with an Easter Egg hunt and are relaxing before church.  We actually had to blindfold our children this morning!  It was raining last night and the bunny didn't want to hide eggs in the rain so we got them out of the house to go take care of their grandmother's dogs.  The bunny told them they had to wear a blindfold when they left so they couldn't see the eggs in the yard.  (Of course there were no eggs in the yard!) 
Yep, winter coats are on!!!  It should warm up today, at least that is what they say.  It SNOWED yesterday!

Thanks so much to everyone for participating in my first blog hop.  I was thrilled with the projects that were linked up!  I am still visiting them :)!  Things got crazier then I had anticipated this week and I haven't had a chance to visit them all. 

The winner, chosen randomly is Suzanne at My Crafty Corner.  Congratulations Suzanne!  Suzanne please email me your contact info so that I can get your blog candy in the mail!!!

Enjoy your Easter.  Give the ones you love an extra hug.  As for us, we will enjoy this day that God gave us and be thankful he sacrificed His son's life so we can have eternal life.

Friday, April 22, 2011

I LOVE spray paint!

***Blog hop winner will be posted tomorrow***

Yes, Pumpkin Orange.  Yes, that was by choice.  Yes, I liked it.  HOWEVER, I wanted something light and summery.  We do a lot of entertaining in the summer and I wanted it more summer like.  Notice the brass light fixture.

In case you missed the fixture.


Here is the etching on my glass globes.

New color.

You almost can't see the grapes etched in.  How fab is the new fixture color?!

So yesterday I got home from vacation and promptly decided to paint my dining room.  I was going to ease hubby into it and hope to have him convinced that it would be a good summer project.  I picked up a bunch of swatches and wouldn't you know as I walked out of the paint aisle they had a can of "oops" paint for 5 bucks in almost exactly the same color as my swatches!!!  So, I decided to paint last night.  I had a light fixture in my dining room that I HATED!  So a couple cans of spray paint and I transformed it, well at least in my opinion.  What do you think?!

Monday, April 18, 2011

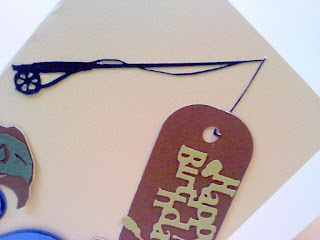
Very simple and quick birthday card for my husband


This week I am on "vacation" with the kids and hubby is back home :(.  It seemed fine when I first agreed to it but I am not sure how much longer I will stay on vacation, turns out I miss him.  We are pretty much just hanging our the place where we are staying and I have a nice big room.  So I brought a few crafting things and I have still been doing some simple simple stuff.  So, today I made this quick birthday card to send to my husband for his birthday this week.  He loves fishing so it was perfect.

I cut the pole 5 or 6 times before I actually found a card stock that would work without tearing at that size, and it was Core'dinations of course! ;)

Most of the other card stock on here is my other favorite, Bazzill.

The fish and pole are from Camp Out and the water is from Life is a Beach.  The sentiment and tag are from Base Camp.

I am entering it into the following challenges:

Birthday anything goes


Sunday, April 17, 2011

Easter Card

Happy Sunday!
****Before leaving my blog check out the blog hop I have going on right now.  I would LOVE to have you link up your project and try to win my blog candy! CLICK HERE!****


I am out of town on vacation and had to bring my Cricut.  I think I have a serious illness :)  I just made a cute little Easter card.  There were a few more things I would have done or done differently but without access to my full craft space I was limited.  Then there are not craft stores anywhere near me!  How will I survive an entire week?!

I used Core'Dinations for the cardstock that is torn.  It is from the Whitewash Collection... how cute is that?!  I took a ton of before and after photos and process photos.  Then I realized that this laptop I have with me doesn't have a place for me to insert my camera's memory card.  YIKES!  I had to take the finish photos with my cell phone which is less than ideal but hey at least I got them!

Supplies:
* Core'dinations and Bazzil cardstock
* Gypsy Wanderings for bunny and Give a Hoot for butterfly
* Queen and Company pearls (Which are made to match Core'dinations!)
* Prima pink flowers
* Glue Dots

I am entering this into the following challenges:
All Sorts Challenge (sketch)
Fantabulous Cricut (Pink, green, yellow)
My Sheri's crafts.. a bunny
CWC Cash in Your Stash (I am finally breaking out my packs of Bazzil cardstock I was saving for special projects)
Paper Variety... use flowers
Die Cut Divas... 2 diff cuts 2 diff cartridges
Flutter By Wednesdays ... butterfly and soft pastels

Friday, April 15, 2011

Blog Candy Here!

Don't forget about our blog hop going on right now!  Click Here!  Scroll down to the bottom to see some blog candy.

We would love to see your creations if you want to join us too!

Monday, April 11, 2011

Blog Hop- A New Season A New Skill

 Welcome to our blog hop!

This is your first stop!  Thanks for coming by!

You can link up your own project and also try for some blog candy!!!


The twist to this blog hop is that all projects have to have us try something new!  Either a new project, a new technique, or a new material/supply.  Thank you in advance for all of your comments!  After visiting my blog please visit the first blog on the list.  Each blog will send you on.  I know there is another blog in the hop with some blog candy so make sure to go through all of them ;).  It is not required to "follow" my post or the others to link up or win the blog candy below.  HOWEVER, I encourage you to follow my blog and any other blogs posted here IF you like what you see.  That, to me, is a huge compliment.

These guest designers have spent a lot of time preparing for this.  PLEASE tell them how much you love what they have created for you!!!
My new thing was making a diaper cake!  You can see the post here.


Nicole


Lolis


Amanda
Want some blog candy?!  All you have to do is link up your project and/or comment on this post or any other on my blog!  You do NOT need to be a follower, although followers are always great if you like what you see on my blog. I will post the winner of the blog candy on Thursday the 21st.  You also have until then to submit your projects!
In this candy you get some FUN K&C chipboard letters and pics, a cardstock stack, Mother's Day, and Father's Day clear stamps.

Want to link up your project?!  I would LOVE it.
*All you have to do is tell us in your blog post what is NEW to you in creating the project and link back to this blog in your post.
*PLEASE provide a link to this post from your blog when posting so others can participate!
*You do NOT need to be a follower but I encourage following any of my designers or my blog if you like what you see.  Please link us only to your blog POST and not your entire blog.
*After clicking "Publish Post" click on "View Post."  Copy and paste that URL into Mr. Linky below.

Sunday, April 10, 2011

Blog Hop- Right here starting Monday night!!!

Tomorrow my first Blog Hop kicks off!!!

I am so excited!  Some awesome projects have been created to give you inspiration from very talented people.

The Hop is called "A New Season A New Skill."  For this Hop you need to try something you have never done.  Do something or use something you haven't done before.

I will show you my inspiration project tonight to get you thinking and tomorrow you will get to see the rest!

Send your friends over to check it out tomorrow night! There will also be blog candy!

I made my first diaper cake!!!  This was SO much EASIER than I had anticipated.  Later I will post a tutorial if people are interested.

I also put a small little banner I made on the bottom.

For the animals I used Zooballo and Animal Kingdom.

The cardstock is mostly Core'Dinations and Bazzil with random other things.


Friday, April 8, 2011

HELP! Tell me what to do... Which embossing "machine" do I get?

I am thinking I NEED some type of embossing machine thing do I need/want?

Can you tell me which one you have and what you do and don't like about it?  I need lots of feedback because I am a researcher by nature.  HELP! Please :)

Wednesday, April 6, 2011

Baby Shower Gift

Hi there,

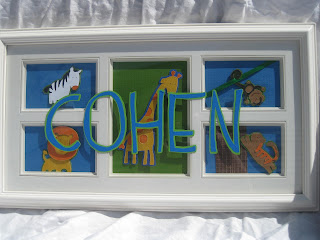
Sunday I have a baby shower for a very kind lady in our church.  She is having a little boy and decorating the room with a jungle theme.  So I made this personalized gift for her baby.

All the animals are cut from Zooballoo and so is the font.  I used Core'dinations cardstock for the animals (except the black and white on the zebra).  I sanded them all very lightly to give it a little texture and more "fur like."

The vinyl is on the glass.  I had a little trouble with the shadow and the regular font adhering correctly but I am OK with the end result.  I would like to move the letters some but I am afraid I would only mess it up more!!!

 
Pick out a frame.  I got this one on clearance and it was perfect for what I wanted to do.

I tend to put a million things on my mat at once.  It minimizes how long I have to wait for cuts.

 I used the "pictures" that came in the frame and cut my cardstock to cover them perfectly.  This is Core'dinations cardstock from their Ebony & Ivory pack.
 One animal at a time :)


After putting all the animals on I measured my frame and drew lines on the glass with marker.


* I then put the green layer of letters down on the glass.
* The blue letters had to be done one letter at a time because of the shadow feature not lining up right.
* I did use transfer tape.  Vinyl sticks fast on glass so you need to work quickly and as accurately as possible.

I linked this over to Getting Cricky which you can find here.  Her challenge this week was about creating something from the heart, something that inspires you.  Not much inspires me more than new life.  I loved creating this and thinking of the baby and the mom receiving it.
Thanks for visiting!!!!

Tuesday, April 5, 2011

Ooo-La-La Winner

Thanks to Sheri over at My Sheri Crafts for the Ooo-La-La award!  Take a trip over and check out her fun challenges!

I won it for this card.

Blog Awards!

Thank to all of my followers!  You guys just make my day.  SERIOUSLY!  I am OCD about reading your comments and getting your feedback.  Tonight I am going to post 3 blog awards and a project recognition!  YAY!!!!

Then there is the Versatile Blogger Awards!  Thanks to Susan and ScrappinC for this award!


PLEASE check out their blogs and see the amazing work they do! It really is fabulous.

The "rules" of this award:


1. Thank the person who sent it to you
2. Tell 7 things about yourself
3. Send this to 5 fellow versatile bloggers
Here are 7 things about myself:

1. I am a bargain hunter. I LOVE sales. I LOVE coupons. I think it is great to save more than I spend.
2. Growing up I swore I would "get out of this town" one day. And I did... for college. I live in the town I grew up in and raise my kids with kids of parents I grew up with.
3. I tend to just say it like it is. People may find that a bit rude of me ;)
4. I am the oldest of 4 kids (3 girls and a boy).
5. I miss my sisters, one lives out of state and the other has gone home to the Lord. Not a day goes by that I don't wish they were here and near me.
6. I love gadgets.
7. I LOVE teaching kids how to read, nothing gives me equal satisfaction about what I pass on in this world.


Passing it on.... This is ALWAYS the hardest part. I follow so many incredible blogs and hate feeling like I am "leaving people out."  WIth that said, please know that I find so many of your blogs AWESOME!
1. Melissa at Crafty Gator
2. Houses Built of Cards
3. Kimberly
4. Arlene
5. Lisa


Thanks to Jessica for this award!  I love her blog!!! Skip on over there and CHECK. IT. OUT.

The rules of this award are:
1. Post about it on your blog with a link to the sender.
2. Pass it on to  those who visit your blog and leave comments regularly.
I have a lot of faithful followers.  I am so thankful to all of you.  I decided to just put down 3 blogs for this because I could go on forever with how awesome all my followers are!
(These are in no particular order!)
1.Girlia 
2. Jani
3. June

Monday, April 4, 2011

Baby Shower Card

Good Evening!

After finishing up my last projects I thought I was done crafting for at least a couple of days.  I found myself right back at it tonight though :)

My craftroom mess is spilling into the kitchen and screaming PICK ME UP!  Maybe tomorrow...


This card is for a friend's baby shower on Sunday.  I also need to make some decorations for it this week and the gift.  I probably should get on that!

I cut the image on this card from A Child's Year.  The sentiment is from Stampin' Up.  I went through a phase where I bought a ton of Stampin Up stuff even though I didn't/don't really use them.  I am trying to start using everything I have and I have some cool stuff I am discovering ;).

Thanks for visiting.

I entered this into the Fantabulous Cricut challenge to have an umbrella in the project.

My Sheri's Crafts  is all about April showers!

Sunday, April 3, 2011

Jungle Birthday Cake

Hello there,

  I posted this a bit earlier tonight.  I wanted to separate it out from the other post because that one is so long.  If you want to see how I did it or tons more pics of this click here.  This was really fun to make and my son is going to love it!

For Desert Island Crafts you needed to use at least three of the following.  I BOLDED the ones I used.
Berenice's Desert Island Itinerary
1. Ribbon (see the monkey "vine")
2. Glitter
3. Birthday theme
4. Bow
5. Dots
6. Pearls
7. Child image
8. Balloons image
9. Bright colors
10. Easel card technique
At Getting Cricky there is  a "for the birds" challenge going on... My top layer is Parrots :)

Birthday Card

Hello there,

I just posted this card as a part of a HUGE post and wanted to separate it out for the challenge over at Allsorts Challenge.  They want flowers... I love the flowers on her dress!  click here to participate.

If you want to see what supplies I used and how I did it check out this post.  Scroll to the bottom.  It is the last project on that post.  I also have a cool birthday banner and a big paper cake there.

Thanks for visiting!

My Core’dinations Creative Frenzy


It has been quiet on my blog this past couple of weeks because I have been super involved in a few projects that you will find below.

Just a warning.  This is a LONG post!  I have also provided links to other posts in order to make this a bit easier to load for people.  Below each project description you will find some step by step directions and links for further information on how to do the projects I did.  PLEASE email me if you have questions!

So without further ado here is my post for today!

Is all cardstock created equal?
HECK NO!

I have become totally addicted to Core'dinations Cardstock.  In fact, I went into the local craft store last week and talked to the store manager about how we need more of it!  Wait until you see EVERYTHING you can do with it!!!

Here are some recent projects I have created with their cardstock.  After showing the pictures I will take you through more detail on each project and provide links to instructional posts.  I like to make things a little outside the everyday items:)  Also, when creating for challenges, hops, and other things I like to create something I actually NEED to create and not just random things.  So with each project you will see why I found that project something I should make. (There are 3 projects this blog focuses on.  At the bottom are some images and links to recent projects using Core'dinations.)


Ok one project at a time here .  
First let's talk about the super cute owl banner!


To give you an idea of how much Core'dinations dresses up your project check out this image.  I created the banner without Core'dinations and then I did it again using Core'dinations.  How can you NOT want to run out and buy some now?! :)
Core'dinations

Regular cardstock


 Look at how much it POPS when you use the Core'dinations!!!!


Supplies:
* Stacy Julian's Happy Colors Core'dination pack.  You can see it online here.
* Cricut cutting machine
I have a Gypsy and find that I use many cartridges on one project.  This project could be adapted to use with fewer cartridges.  I just like to play with all of them. :)
* Paisley Cricut cartdidge for the owls
* Accent Essentials Cricut cartridge for the flowerlike things over the rosettes
* Celebrations Cricut cartridge for the banner flags
* A Child's Year Cricut cartridge for the lettering.
* Sandpaper (I used 150, 180, and 320 depending on the effect I wanted.)
* Fiskars Shapeboss and "stars" template
* Adhesive of your choice
* I used patterned paper (American Girl) for the rosettes, although I think more cardstock would rock here too!
* Ribbon to hold banner up.   I bought SUPER CUTE ribbon for this and realized as I went to take the photos it wasn't long enough :(

So, how did I do it?!
1. Cut my flags on the Celebrations Cricut cartridge.
2. Changed the size of the flags and cut them again using the embossed Core'dinations cardstock.
3. Sanded each of the words I wanted to pop on the flags with 180.
4. Created the rosettes. For a tutorial on how I did that click here.
5. Cut out the flower shapes from Accent Essentials also using Stacy Julian cardstock.  I then sanded those using 150.  
Here is a pic of what this looks like sanded and unsanded... both look awesome.  The pic doesn't show it as well as it does in person but you can get the idea.  In the pic you will also see "regular" cardstock as a comparison to how different it is.

6. I created the letters.  The letters were embossed using Fiskars Shapeboss which works awesome with the Core'dinations cardstock. For a tutorial on how I did the letters and more information on the embossing and sanding click here.

7. I made the owls using scraps from the other parts of the project.  I LOVED part.  I used 320 for sanding on the owls.

8. Glue it all together and VIOLA I have a very happy 7 year old!!!!

Now, let's talk CAKE!


 Is that yummy enough for you?!  Each "slice" is filled with a yummy treat too :)
My son opted to go to a special themed hotel for his birthday this year instead of having a party.  He picked the Jungle Room.  So I thought I would make him a fun "cake" to match the room.  Here is his jungle cake!  I can't wait until he sees it.
Supplies:
* Core'Dinations paper.  I used Stacy Julian's Happy Colors.  I also used papers from Core'dinations Ebony & Ivory package.
* Cricut cutting machine
* I used the following cartridges: Animal Kingdom, Everyday Paper Dolls, Tags Bags Boxes & More, Zooballoo
* Adhesive
* Sandpaper (150)
* Green ribbon
* Treats to put inside the "slices"
* A cake "topper" (I found this in a pile of animals in one of the bedrooms.)

So, how did I do it?!
1. Cut all the boxes.  For a tutorial click here.
Grass layer:
1. Took the green paper for grass and sanded it lightly to give it some texture.


2. Cut small slits in the top and then tore down to create the blades of grass.

You will also want to tear the tops at a slight angle so you don't have straight edges for the top of your grass.
You can see that a couple in the middle are done here and the outer ones I have not done yet.

Doesn't it look cool when you tear it?!  I love that it isn't white but gives another shade of green to the project!
3. Then I cut my snakes from Everyday Paper Dolls (thanks to my Gypsy and the search feature!) and drew on them some.

 4. Weave the snake in and out of your blades of grass.  Then adhere it to your cake slice.


Tree layer:
After doing the snake layer I came up with the idea to make a "band" around the cake with decoration.  There are pros and cons to each way.  However, I wanted a continuous look on this layer with monkeys swinging from a vine and it helped to make the band.
1. Measured and cut strips to make one long band to go around this layer.  I LOVED the brown color of the cardstock.  I am a huge brown person and this layer was filled with different shades all from Core'dinations!  
A little hard to see on my wood floor :).  This is the strip I created.

2. Sand down the cardstock to give it treelike texture.
On the left you can see the texture you get when you sand it!  Both ways are fabulous but I am on a roll with sanding.
3. Cut the monkeys and monkey layers out using Zooballoo.  For the paper on the outside of the monkey I used my first "Black Magic" paper from Core'dinations.  You can check out that collection here.
With Core'dinations the color strip you see along the bottom is what your "core" of the cardstock is.  So this is what will come out when you sand, tear, or emboss.  This just looks like a hot cup of coffee to me and wonderfully fabulous, so it became the outside of my monkeys.  In the bottom right of the pic you see what I used for the monkey bellies.  
4. I sanded the monkeys because fur has some dimension and I thought it added to that.  I did NOT sand the yellow shadow cut on the monkeys because I wanted to keep it nice, bright, and simple.
5. After creating my monkeys I used mini glue dots to put ribbon on my strip to be a vine.  I then placed my monkeys on the vine.


(I am a teacher and can't help but think of the fabulous trim ideas for my bull. boards with this stuff!  This is the perfect size!)
6. I attached the monkey band to my cake.
Sky layer:
1. Cut strips of blue paper from Core'dinations to make a blue band for my sky layer.  I sanded these very lightly (320) in an upward curved motion.  It made me think of clouds.
2. The Ebony & Ivory set I mentioned first includes some Whitewash collection, which you can check out here.  Click here to see the Ebony& Ivory collection.  I took a piece of the whitewash with a blue core to make the clouds.  I freehand drew them and then cut them with scissors.  I probably could have just used my Cricut which didn't occur to me until I started writing this!
Whitewash piece I used.

Clouds
 3. I lightly sanded the whitewash to give it a softer look.  You really can't tell in this picture but in person it does make a difference.
4. I cut the parrots out using scraps from my other projects with Core'dinations.  I LOVE my scraps :)
5. I used my glue dots and put everything on my top layer.
Phew, what a project!!!  I love how much this cardstock does for me without needing patterned paper.


How about a simple card to top it all off?

Supplies:
* Black magic paper and coordinating sheet from Core'dinations.
* A few pearls for bling
* Cricut Machine 
* Cricut cartridges Forever Young and Gypsy Wanderings
* Adhesive
* Sandpaper (I used 150)

So, how did I do it?!
Let me start by saying, this project was so EASY!  It took me longer to decide which girl to use from the cartridge then it did to make the card.
1. I cut the girl out and the sentiment. (This includes the dress layer and the dress)
2. I cut the piece of black magic paper I wanted and scored a straight line down it about a half inch in.  Then I tore along that scored line to reveal the pink core.
3. The top layer of the dress is the same cardstock that is on the left of the card.  I just sanded it down to reveal some of the core.
4.  Added a bit of bling and there I go! 


I have a bunch more cards I need to make over the next couple of weeks so be watching for more Core'dinations!

A few of my other Core'dinations projects if you are interested: 


Easter Card
Related Posts Plugin for WordPress, Blogger...